Saturday, June 26, 2010

Apple cake

I love 'collecting' cook books, of course I cook from them as well. However, I've stopped myself from buying them for a while, only because I'm running out of book shelve space! I really need to do some rearrangement before I can buy anymore. But I can tell you, restraining myself from buying anymore kitchen appliances/gadgets and cookbooks is VERY hard, especially during this sale period!!!! arrrrggghhhhh.... wish I have a bigger house, bigger kitchen, bigger storage space!

I think I started doing some cooking and baking around 15 years ago, and therefore my cookbook collection started back then, but I definitely wasn't as keen in cooking as I am now. So the 40 odd cookbooks were probably bought in the last few years... =P

The other day as I was looking through my collection to see what dessert I should make for home fellowship, I saw this tiny little book called 'Glorious Cakes & Gateaux'... And at the front, the price sticker is still there... '$3.50'... wow... do you think that we can still get a cookbook for $3.50??

I started flicking through the book, I really haven't touched this book for a while, I remember my favourite recipe from this book is the Black Forest Cake!!! =) This time for HF, I wanted to make something that you eat warm, because of this cold weather, don't think a mousse cake or any cold dessert is such a good idea!

Apple cake!!! I love apple in my dessert, I love the sour taste together with the cinnamon and using brown sugar to add the sweetness to the plate. And the recipe seems very easy, so that's definitely my pick!

Ingredients:
250g self raising flour
2tsp baking power
1 tsp ground cinnamon
130g caster sugar
50g butter, melted
2 eggs, beaten
150ml milk

Topping:
2 apples, peeled, cored, sliced thinly
1tbsp butter, melted
4 tbsp raw sugar
1/4 tsp ground cinnamon

1. Preheat oven to 200C. Grease and line a 20cm cake tin.
2. Sift the flour, baking power and cinnamon together into a bowl. Add sugar. Whisk the butter, eggs and milk together. Stir into the flour mixture.

3. Pour the mixture into the tin, smooth the surface, then make a shallow hollow around the edge. Arrange the apple around the edge. Brush with butter and scatter with raw sugar and cinnamon
4. Bake for 45-50min. Serve warm.

Obviously the cake wasn't served immediately because it was baked the night before. Since I couldn't make it to HF last night, so my hubby was the representative and took the cake along with him. But surprise surprise.... he didn't reheat the cake in the microwave, so the cake was served cold! =( Afterwards, my hubby told me that the HF bros and sis requested if next time I couldn't come to HF, I should leave a note on top of the cake and give instruction of how to eat it... haha... I was lucky enough to have one small piece of cake left over, and I of course reheated it in the microwave!!!

Overall I found this cake is a bit too dry, I might have over-cooked it a bit in the oven! =P And I think it can go a bit sweeter, most of the flavour came from the topping, and the cake itself tasted a bit bland. Maybe next time I'll modify the recipe a bit and give it another go!

Monday, June 21, 2010

Buttermilk Chicken Drumsticks

Winter is cold this year, and my house gets especially cold, probably because of the floorboard and the trees around the house that shades out the sun - which is pretty good in summer time!! And this is probably one of the reasons why I crave for some hearty meal!!!!

I love this buttermilk chicken drumsticks dish, not only it's very easy - chuck everything in a bowl to marinate overnight, then roast in the oven the next day, and it's also very tasty!!!

Ingredients:
8 drumsticks (you can put a few more in if you want... there's enough marinate for 3-4 more!)
600ml of buttermilk
2 cloves of garlic, chopped
1 tbsp crushed peppercorn
1.5 tsp table salt
1 tsp ground cumin
1 tbsp maple syrup
drizzle of vegetable oil

1) Put EVERYTHING in a large bowl and marinate overnight in the fridge. Make sure that the drumsticks are well coated. I like to toss it again in the morning to get a more even coat of marinates.
2) Preheat the oven to 220C. Drain the marinates and place the drumsticks on oven tray lined with foil. Drizzle with some vegetable oil on top, and roast for 30-40 minutes.

Ta-da... isn't this easy?!? You need no more than 10 min of preparation time! The spices from the peppercorn and cumin have made this dish so tasty... I love cumin!!! It just have a gorgeous taste! And the use of buttermilk helps to make the chicken extra tender. There have been a couple of times where I replaced maple syrup with golden syrup (hahhaha... yeah... didn't have maple syrup at home!!) but it just doesn't taste the same!!! So I guess maple syrup is one of the crucial ingredients that makes these drumstick taste fantastic. You can always serve this dish with some roasted vege to make the meal extra hearty!

oh oh... and to make it extra extra hearty, hug a hot water bottle with a cosy throw wrapped around you, sitting in front of the TV with the meal on your lap.... perfect winter night!!

My recent purchase!! Cute little hot water bottle... =)

Saturday, June 19, 2010

Almustafa @ Glebe

On the Queen's birthday Monday, we went out with a few friends to city to have a photography trek. A friend of ours, Danny is a 'half-professional' photographer... why am I saying he's 'half-professional'?! Not because he's not up to scratch, only because he has another half profession as an architect! Having a photographer friend, how can we not make use of him and ask him to give us some hints and tips in photography! By the way, he was the second photographer in our wedding... yes I do like to make use of my friend's profession! haha... 


After 4 hours of photography in the cold, my legs were so tired from all the standing and walking, and my stomach started to cry for food!!! Since everyone had other commitment after the shoot, so only left with hubby and I to go and hunt for some food to calm our stomach! Both of us were scratching our heads as to where to go, since it's public holiday, and we were not sure what's opened and what's not. At the end, we decided to go to Glebe for some Lebanese food, even if it wasn't open, there's plenty of other food to choose from along Glebe Point Road. 

Once I've heard from a friend that there's a Lebanese restaurant in Glebe that is quite good, but I just had no idea of the name. Thanks to the invention of iPhone and Mr. Google, we found a Lebanese restaurant in Glebe, but didn't sound familiar... but who cares, we were both hungry!! Like all restaurants that we haven't tried or heard of, we'd peep from the outside to see whether it's empty or full... OK... it's full - food can't be too bad.... so we walked in. 

We were greeted by a friendly staff, and the inside doesn't look too attractive, especially the court yard, it just looks like a old local restaurant! We were led to a table, and we opened up the menu, and we thought.... OK, besides the hoummos, I had no idea about the other food on the menu! Oppss.. forgot to mention, this is the first time both hubby and I tried Lebanese food, but I definitely heard alot about it from people at work. And it was only when we saw the Lebanese food tour on Food Safari that clicked us that we should try it! 

Our friendly waiter suggested a few dishes that we should try, and we went for it! 


Hoummos with lebanese bread

This was quite nice, although there was a 'well' of olive oil in the center, but it just didn't taste oily at all! However, if the lebanese bread was served warm, then it would be definitely better! 


This is a salad dish with tomatoes, shallots cucumber, radish, parsley, onion, capsicum and mint with pomegranate and lemon dressing. Yummmm... this was a very refreshing salad, and it was tossed with crushed crispy lebanese bread, which gave the salad an extra layer of texture!!!! 


Soujouk - spicy sausages

Lebanese food ingredients focus on alot of herbs and spices, and these sausages are no exception! In fact, the herbs and spices were too strong to my liking. But it still tasted good, and I started to dip the sausages in the left over citrus dressing of the salad, which helped to calm the flavour a bit. 


Lamb Mansaf

This was our FAVOURITE dish of the night. Highly recommended. It was a baked leg of lamb cut in strips and served on a bed of rice cooked with herb and minced lamb, topped with cashews and pinenuts, with yoghurt and chili on the side. The lamb was full of flavour, and I do mean full of lamb flavour!!! The meat was tender, and slightly pink in the center - perfectly cooked! And the rice was amazing, never tasted anything like it before - the rice was cooked just right and each grain of rice was wrapped with the flavour of lamb and herbs! Both hubby and I absolutely loved this dish, and we scraped the last grain of rice out of this dish! However if you don't fancy the unique flavour of lamb, then I wouldn't recommend it to you, because it was indeed very strong which I love! =P 

Overall, I think Almustafa has fabulous food and great atmosphere, both of us walked out with full stomach!!! And I would definitely go back there or try other Lebanese restaurants!!!! If you have any good suggestions, please let me know, love to give it a go! 

Almustafa Lebanese Restaurant
23 Glebe Point Road,
Glebe

Tuesday, June 15, 2010

Popovers...

How good is it to have a long weekend!?!? Although I've been baking and cooking in the kitchen non-stop the last week, but that still didn't stop me from doing MORE baking on the Monday Queen's Birthday! However, I only did something small though!

Recently I've seen a photo from my friends facebook, which she went to a restaurant and had something called 'popovers' - a very interesting name, something that I have never heard of. And then I started doing some research on what 'popovers' is. 

Apparently it's some kind of bread that has a soft, moist hollow center, and crusty outside - sounded something nice! Me being a bread lover, I said to myself that I definitely need to try making it. I've found so many different recipes on the internet, and all of them are relatively easy, but they varies in resting time - some need 1 hour and some don't need any.... I wasn't sure what the resting time is for, so I used the one that require no resting time, just to save the hour! 

Hubby and I decided to go for a swim in the early arvo before going out to the city to take some photos around the circular quay area, and of the Vivid Sydney festival. So we're having a Monday brunch just to avoid the big belly when we go swimming! And the brunch menu was popovers, and sticky rice in lotus leaves. 

Ingredients
1tbsp unsalted butter for the pan
15g unsalted butter, melted and cooled
2 large eggs
250g milk
1/2 tsp sea salt
125g all purpose flour

1. Preheat oven to 220C. Lightly grease a popover pan with 1 tbsp of butter. (I used a muffin pan instead!)
2. Whisk together the cooled melted butter, eggs, milk and salt, then add the flour all at once and whisk until the batter is smooth. 
3. Place the greased pan in the oven for 2 minutes, this helps to boost the popovers rising afterward. 
4. Take the pan out of the oven and quickly divide the batter between cups, filling up to 2/3 full. Empty cups can be filled with some water. 

Popovers in the oven after the first 15 minutes. 

5. Bake for 20 minutes, then reduce the temperature to 180C and bake for another 15 minutes. 

6. Remove the pan from the oven and unmould immediately. Serve warm with butter and jam. 

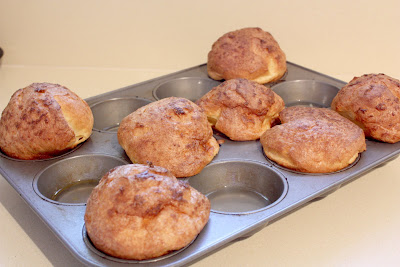
A very easy recipe indeed. But however, mine turned a bit too brown unfortunately, probably because I had the oven too hot at the beginning! =( But besides that, I really love the texture of this bread. The inside was soft, moist and a little chewy! I didn't have mine with any extra butter or jam, the little sea salt in the batter has already got enough flavour for me! I'll definitely give it another go to make it less burnt! =P

Sticky rice wrapped with lotus leaves

OK... besides the popovers we also had sticky rice wrapped in lotus leaves as our brunch. Hahaha... of course I didn't make that, we just bought that from a Chinese grocery store a couple of days ago. There wasn't much filling in there, mostly just sticky rice with a little bit of beans, tiny little egg yolk and pork meat. I remember my grandma used to make these herself in Hong Kong, I think she still does, and of course she would fill it with heaps of fillings to make it full of flavours and extra yummy! I missed all my grandma's traditional cookings - white raddish cake, new year cake, sticky rice... 90 years of cooking experience definitely cannot be ignored!!! 

Monday, June 14, 2010

Not so traditional high tea..


Veuve Clicquot Brut with Wild Hibicus

It was my sister's birthday at the beginning of the month, and because we went away and couldn't have a birthday dinner with her, so it got postponed to yesterday. And I said I'd do a high tea for her at her place!

For the past week, I was busy doing the Thomas Engine Cake, but at the same time I was thinking about the menu for the afternoon tea. Yes, it was definitely a brain teasing week for me!

I had to think of things that I could make beforehand, because my sister's house has such small kitchen which is not good for doing any sort of extravagant cooking!

Menu
Lemonade Scones (how can you not have scones in an afternoon tea menu!!)
Orange & Almond Macaroon
Cream Brulee
Smoked Salmon & Camembert Frittata (my sister always like some savory)
a bottle of Veuve Clicquot Brut (yummmmm.... fantastic bottle of champagne)

I say that it's not so traditional because there was no sandwich and no english breakfast tea! Didn't want to make sandwiches because they need to be made fresh to be good, and as I was saying, there's no room in my sister's kitchen to do any preparation, so I decided to go with fritata which I could make beforehand, and re-heat later.

rustic lemonade scones with fresh cream and saffron citrus marmalade

Lemonade Scones
Ingredients:
2 cups of self raising flour, sifted
1/4 cup caster sugar
1/2 cup thick cream
1/2 cup lemonade
40ml milk for brushing

1) Mix all dry ingredients together with 1/2 tsp salt. Then add in the wet ingredients
2) Roll out the dough to about 2cm thick. Cut out the dough with cookie cutter. Brush with milk and bake in 220C preheated oven for 10-15 minutes.

Mine turned out a bit rustic because I made this at my sister's place (love fresh warm scones!!!), and her kitchen has hardly any bench area to work with, plus she has no cookie cutter! (As you can tell, she's not a baker!) so I had to just roll the dough into balls with my hands!

These lemonade scones are my favourite scones! It's relatively low in fat - no butter in the mixture, plus it's easy to make and it's very fluffy which I like!!! =) I also bought a jar of saffron citrus marmalade from Thomas Dux to go with it. It has a beautiful citrus taste from probably orange and lemon, however, I couldn't taste the saffron though!

macaroon shells fresh from the oven

Orange & Almond Macaroon
Ingredients:
3 egg whites
1/4 cup caster sugar
orange food colouring
200g icing sugar
120g ground almonds
1 tsp grated orange rind
2 tbsp flaked almonds
1/3 cup of orange marmalade

1. Beat egg whites until soft peak form. Add caster sugar and a few drops of colouring, beat until sugar dissolves.
2. Fold in icing sugar, ground almonds and rind in batches.
3. Spoon mixture into pipping bag with plain tube. Pipe rounds with 2 cm apart onto lined tray.
4. Tap tray on bench and sprinkle with flaked almonds. Stand 30 minutes
5. Preheat oven to 150C and bake for 20 minutes. Cool on tray.
6. Sandwich with marmalade.

The look of my macaroons didn't turn out as smoothly as it should be. Not sure the reason why, but I think it might be because I didn't rest it for 30 minutes... I overlooked this step! =P However, they still tasted good, with a thin crusted top, and chewy inside! I think I might try doing an earl grey flavour next time!

Cream Brulee
Serves 6

Ingredients:
2 vanilla pods
300ml double cream
200ml full fat milk
8 egg yolks
80g sugar

1. Run the knife up the pod to remove the seeds. Scrape these into the pan with the pods, cream and milk and slowly bring to the boil then remove pod.
2. Beat yolks and sugar together until light and fluffy.
3. Add the cream mixture into the yolk little by little, whisking continuously. Then strain the mixture.
4. Divide into serving dish, and stand these in a roasting tray filled with water half way up the dish.
5. Bake in the preheated oven for around 25 minutes until the custard mixture set, but is still wobbly in the center.
6. Cool and refrigerate. Just before serving, cameralise it with blow touch.

Cream brulee is always divine to eat, but not so sure about the extra inch on the waistline! I very rarely make cream brulee because of the naughty ingredients. Oh well... it's my sister's birthday, so it's a special occasion!


frittata before going into oven

Smoked Salmon & Camembert Frittata
Ingredients
100g smoked salmon
100g camembert, thinly sliced
1 leek, chopped (I used onion... cos that was what I had in my fridge!)
1 clove of garlic
8 eggs
40ml of milk
1 tsp chopping dills (I used the left over thyme at home, again I couldn't bother going out to get some dill! Yes I'm lazy!)

1. Stir fry the garlic and leek with a little oil until soft. Then spoon it into the bottom of a baking dish.
2. Layer it with smoked salmon and camembert.
3. Whisk the eggs together with milk, and season with salt and pepper.
4. Pour the egg mixture over the smoked salmon and camembert. Bake in a preheated 190C oven for 30 minutes.

This dish was delicious!!!!! Something I definitely would make again, it was full of flavour, and everyone at the table had their thumbs up! The smell of smoked salmon, and thyme filled the whole house, and I was so tempted to dig a spoon in after it came out of the oven, of course I resisted, because I knew that it was for the next day! But I couldn't resist myself from keep on taking deep breaths and sniffing the beautiful smell!!! =P


After two nights of making Mr. Thomas The Tank, I just really wanted to make something simple for this afternoon tea. Actually not just simple, but quick and with variety! I made the macaroons, cream brulee and frittata on saturday night within 3 hours including all the clean up done. Not bad!

Everyone enjoyed the afternoon tea at my sister's place. Although it was only a small and intimate celebration, but it was awesome. And my sister has a real fireplace at her house, and we had that going to keep us nice and cosy! I love real fire place!!!! I wish I have one in my house!

Happy birthday dear sis!


Thomas The Tank Engine Cake


A friend of mine Shae always make these amazing cakes, which I would go 'Wow'. She doesn't only make the usual round and square cakes, she also does character cakes, and novelty cakes. Oh yes, she also made my wedding cake! I remember one year for my birthday she made me a santa claus character cake (because my birthday is close to xmas, and she knew that I didn't like combining my birthday with xmas and get one less pressi, so she did this especially to pay me out! Thanks Shae!! =P) But anyway, the cake was amazing, and the best bit was when she beheaded the santa claus! Everyone just went 'Ouchhhhh...'

Making a character or novelty cake never really crossed my mind, because it looks hard and didn't think that I could cope with the hard work and detail. Recently a friend of mine asked me to make a Thomas The Tank Engine Cake for her son's 5 year old birthday. At that very minute, I was stunned... 'uhhhhhh.... that's a bit of a challenge!!!' Once, I made a cake in the shape of the number '1' covered with butter icing, and I already had difficulty, and this time I was asked to do Mr. Thomas?!?! I didn't really want to say 'no' because deep down I really wanted to try, but on the other hand, I knew that I had no idea how to make it, and didn't want to ruin little Jeff's birthday by giving him a cake that doesn't look like Thomas! After a few days of consideration I said 'yes' and at the same time, started to research and seek help from my dear friend Shae!

Lucky that Mr. Thomas is a well known character and all kids love him, and therefore a lot of people out there have made a Thomas cake before, and I could find references and hints and tips easily! To be honest, I have never iced a cake before using white icing, not to mention about colouring the white icing!!! And I took up this task of making Mr. Thomas, I started to panic!

I went to my cake guru Shae for help, and asked her for a verbal crash course! And lucky that she told me that I can never use the gel colouring to get the rich black and red, otherwise I would be standing there the whole night putting the whole bottle of black colouring into the sugarpaste! And she was generous enough to give me some of her spare black and red icing, so I didn't have to go and buy a whole block! Thanks Shae.

I started making the cake 2 nights before, and once the cake was out of the oven, I was relieved, cos at least the cake turned out well! The cake needed 1.5 hour to bake, so while it was in the oven, I started to colour the icing (apparently I had to colour it one night before the assembling because the colour tends to darken over night!) Got out my rolling pin, toothpick for dipping the colour, ready to roll icing and icing sugar... all set and ready to knead! I was very cautious in how much colour I put in, because I knew that there was no turn around! And at the end, it wasn't as hard as I thought! First night gone, and everything seemed good, and ready for tomorrow's cake building!

Second night, I looked at all the cakes and coloured icing on the kitchen bench, took a deep breath and started slicing the cake into blocks!!! I had the knife in my hand and I was so scared, because I wouldn't have a clue how to fix it if I sliced it wrong! Lucky my dear hubby was by my side THE WHOLE NITE in the kitchen helping me!!!!!! Very sweet indeed, I don't remember there was one time that he helped me out in making a cake in our 7.5 years together! So this time he gave me a very BIG encouragement! Big hug from me!

I really took my time in cutting the cake, rolling the icing, and moulding it on top of the cake because again I didn't want to make any mistake. It's true that Shae told me it's not that hard, it's just like making a sculpture in art classes!

I must say, it does take a lot of effort in making the Thomas The Tank Engine Cake, but I really really did enjoy it! It was great fun! I think I'll do it again if someone ask me to! After making this cake, I totally understand why the novelty cakes and wedding cakes charge such a high price!!!

Sorry guys, I didn't take any 'step-by-step' photos for Mr. Thomas, because I really had to concentrate in each step, and didn't want to take my attention away!

Happy Birthday Jeffrey!!!

And big thank you to Shae and my hubby!

Banana Bread - THE nice version!

I mentioned earlier in the blog that I haven't found a good recipe of banana bread all these times. And finally I have found one! One that actually taste like the cafe banana bread! Thank you Jo for his recipe!!!! 

I bought 4 bananas and was looking forward to make this recipe, normally the bananas would ripe in about 4 days on the kitchen bench. But because of the recent cold weather, I waited for TWO WHOLE WEEKS before they turned brown/black! That was a long wait! 

Ingredients: 
1/2 cup of butter
1 cup of brown sugar
1 egg
3/4 cup banana mashed (I used 4 medium size bananas - a bit more than 3/4 cup)
2 tbsp milk 
1 tsp baking soda
2 cups of plain flour
2 tsp baking power

1. Cream butter and sugar together. Then add egg.
2. Add 2 tbsp of milk to banana, and gently fold the banana mixture to the egg mixture.
3. Sift the baking power and baking soda together with the flour. 
4. Fold the flour into the mixture made in Step 2 a little at a time. 
5. Bake in a preheated 170C oven for 1 hour. 

This banana bread is nice and fluffy with a very consistent texture throughout. After the banana bread is cooled, I usually cut it into thick slices (I cut this loaf into 8 slices), and wrapped individual one with glad wrap and freeze it. And when I want to eat one, I'd defrost it in the microwave, then spread it with butter on top, and grill it! Then you'll get a nice crunchy top, but yet still moist inside!!!! Perfect for winter breakfast and afternoon snack!!!! 

Chicken Basil Fried Rice

Haven't updated my blog for a while, not that I haven't been cooking much, I was actually too busy cooking, and haven't got the time to update! Give me some time, I do have a few in the pipeline!! 

In the last post, I mentioned about the Chicken in Milk I made for my hubby's friends visit, and of course there were left over chicken. I asked my hubby to de-bone it for me after dinner, so I can turn it into another dish the next day. It's always good to make use of the left overs, and magically turn it into another dish which is totally different! Same ingredient, but different taste! 

I used the left over chicken to make Chicken Basil Fried Rice. I love the taste of basil, the fresh and unique fragrant together with the chili turned the dish to have the taste of Thai! I love Thai food! 

Ingredients:
1 medium brown onion
3 cloves of garlic
2 chili
1 tbsp brown sugar
left over chicken
handful of green beans, chopped coarsely
3 cups of cooked jasmine rice
2 tbsp fish sauce
2 tbsp soy sauce
handful of basil 

1. Heat oil in a wok, and stir fry the onion, garlic and chili until the onion is softened. (You will get a very strong smell of chili at this point, be aware!) Add sugar, then chicken and beans. Stir fry until the beans are just tender. 
2. Add rice to wok with sauces. Toss gently to combine. Remove wok from heat, and add basil leaves. Toss gently. 

If you don't like the heat from the chili, you can always de-seed the chili before you put them into the wok. And feel free to be creative with the vege, I only added beans because that was what I had in my fridge. If I bothered to go out and get some vege, I would add in some red capsicum for more colour!