Tuesday, August 24, 2010

Cheese and Bacon Muffin

I always wanted to try to make some savoury muffin, but I never seems to have the right ingredients at home... until now!

After making the pizza, I have some left over cheese, and I also found some bacon in the fridge... lets roll out a tray of cheese and bacon muffins!

In my Muffin Bible, I found a recipe of Bacon & Tomato Muffin, and a recipe of Caraway & Cheese Muffin... but no Cheese & Bacon Muffin... ummm... so I modified the Caraway Muffin recipe and turned it into Cheese & Bacon one! =P

Ingredients:
2 cups self raising flour
1tbsp baking powder
1/4 tsp salt
1 cup grated cheese
4 rashes of short rind bacon, diced
1 egg
3/4 milk
50g butter, melted

1) Pan fried the bacon in frying pan. Set aside.
2) Sift flour, baking powder and salt together
3) Stir in grated cheese and bacon pieces
4) Combine egg and milk. Stir melted butter, egg and milk into dry ingredients until just combined
5) 3/4 fill greased muffin pans and bake at 200C for 15-20 min

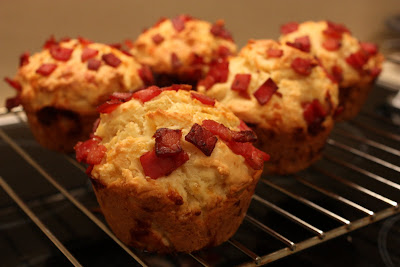
When I made this muffin, the kitchen just filled with the smell of the goodness of bacon! I think you'd really enjoy that moment if you are a bacon lover! The tray of muffins came out of the oven, and each of them had a perfect golden colour. I took a bite, and it has the thick texture created by the melted cheese... however it lacked the saltiness that a savoury bite should have. Perhaps if I used parmesan cheese instead of the mozzarella cheese would fix the problem. The bacon pieces on the top of the muffins are crunchy and they are the sole flavour in these muffins.

In conclusion.... my preference is still my favourite raspberry muffins! hehehe...

Thursday, August 19, 2010

Homemade Chicken Pizza + Orange & Fennel Salad


As I was digging through my freezer the other day, I saw this glad wrapped lump of dough in there.... ummm... after a while of searching in the back of my mind, I remembered that this is a unrolled pizza base which I made a while ago!!!! Opppsss... maybe it's time for a homemade pizza again! (If you want the recipe for the pizza dough, have a look at the post about Homemade Pizza with Sausage, Tomato & Salad) Besides this forgotten pizza dough, I also found 2 pieces of chicken thigh fillet in there, no doubt it was gonna be chicken pizza!

Firstly I chopped up the chicken fillets into bite size pieces, then marinate them in some sweet chili sauce, soy sauce, salt and sugar for about 10 minute then pan fried them. Now I can rolled out the pizza dough!!!! Ummm... the texture still looked pretty good, therefore I was assured that it was still eatable! hehehe... =P I smeared a thin layer of sweet chili sauce on top of the rolled out dough... yeah, I was trying to make a thai flavour pizza! Then sprinkle it with thinly sliced onion, pineapple pieces, sliced red capsicum and the cooked chicken pieces, lastly some cheese.... now it's ready to go into the oven! I baked it for approx. 20 minute with the bottom element turned on in the oven at 200C.

While it was baking, I went and started preparing the salad! I sliced up the orange and arranged it on plate, topped with some salad leaves, and fennel on top. I was looking at it, and felt it looked a bit boring, so I roasted some almond and sprinkled them on top! Perfect!!!!! Looked much better!!! hahaha..... OK... what dressing should I make?!??! I wanted something light, and not too overpowering.... honey mustard vinaigrette!!! I mixed a tablespoon of grain mustard, some honey, a dash of olive oil and vinegar.... easy... you can adjust the flavour according to your own liking!

My attempt of making a thai chicken pizza turned out to be not so thai, I should have added some lemon/lime juice to the chicken marinate for more Thai flavour, and also some sliced chili for some heat! The orange and fennel salad was awesome, the liquorice flavour from the fennel was well balanced by the sweetness of the orange, the crunch from the fennel and almond added a nice texture to the salad. The dressing wasn't too overpowering, just enough to give the salad the extra flavour! Nice!

Wednesday, August 18, 2010

Turkey & Cheese Bread

It's very rare that I have a quite morning at home, no house cleaning, no going out, just stay at home and relax.... 9am in the morning already thinking what to have for lunch! haha... A relaxing day like this, means bread time!

After the sausage bread last time, I thought I'll try to do something like the ham and egg bread you get from the chinese bakery! I opened up the fridge... ummm... no eggs, and no ham.... but found a can of Turkey Spam in the pantry and some cheese in the fridge! Ok... Turkey and cheese bread!!!

I just basically followed the same recipe from the sausage bread, but instead of putting in the sausage, I rolled it with the thick slab of pan fried turkey and half a slice of cheese. Ta-da... lunch is ready!!!! After the first bite, my hubby already asked me to make it again! Personally I like the sausage one better!

Rice with Tomato & Spinach

A friend of mine bought me a cookbook - Marie Claire "Spicy" in return for the Thomas cake I made for her son Jeffrey. As usual, as soon as I got the book I started tagging it!!! hehehe... The recipes in this book are actually quite interesting, when I first read the book title, I thought it was about hot and spicy food. But in fact, it's a collection of recipes that uses herbs and spices like tabouleh, fish tagine, baked quinces with orange and cardamon etc etc.

One of the recipes I tagged was the 'Rice with tomato & spinach'... yes yes... the title doesn't sound very exciting, what really caught my eyes was the colour of the rice, the rich vibrant yellow colour with a dash of red from the tomato. Very eye catching indeed!

Ingredients
1.5 tbsp butter
1 large bunch of spinach, finely chopped
2 cups basmati rice
3 tbsp olive oil
1/2 tsp ground turmeric
1 tsp ground cumin
1 red onion, finely sliced
2 vine-ripened tomatoes, finely chopped
3 cups of vegetable stock (I used chicken stock instead, because this was what I had at home)

1) Melt the butter in a frying pan over medium heat. Add in spinach, cover and cook until the spinach is dark green and softly wilted. Remove and set aside.

2) Wash the rice several times. In a large saucepan, heat the olive oil over medium heat and add the turmeric, cumin and onion. Cook for 5-7 min, or until the onion is golden and slightly caramelised. Add the rice and stir together for 1 min.

3) Squeeze out excess moisture from the spinach, then add it to the rice along with the tomatoes and stock. Stir once, then bring to a boil. Cover for 25 min. serve with yoghurt.

Basmati rice is different to the medium grain rice I used to have, it doesn't have the stickiness to it, and it's a bit softer than the long grain rice. The rice was full of flavour mainly because of all the spices, however, not too strong though, just right!! The use of tomato helped to balance out the intense flavour from the spices. I didn't add in any yoghurt because I didn't have any at home... haha... maybe I'll try it with the yoghurt next time, the acidity of the yoghurt will probably add in an extra depth of flavour to the dish, and make it even more exciting in taste!

Beef Bourguignon

Work has been hectic lately, and every night by the time I got home and had dinner, I just fell asleep on the couch, if I don't fall asleep, I just wanted to sit there and do nothing! Not good! Finally tonight, I don't feel as tired and can continue to blog! There are a few dishes waiting for me to blog about! =)

I always wanted to try to make the beef bourguignon, but never had the time to because it takes like almost 2 hours in the oven! Every time I think of the long oven time, I wish I have a pressure cooker!

Ingredients:
1.5kg boneless shin/gravy beef, diced in 3cm cubes
4 sprigs of flat leaf parsley
4-5 sprigs thyme
1 fresh bay leaf
2 cups red wine
1 cup beef stock
1 tbsp plain flour
1 tbsp olive oil
30g butter
12 small pickling onions or shallots, peeled
200g button mushrooms, stalks trimmed
250g bacon, rind removed, cut into short strips
1 cup water

1) Place beef in large bowl, add the herbs and wine. Refrigerate for 2 hours or overnight.

2) Preheat oven to 180C. Drain the beef and put aside the marinade and herbs. Pat the beef dry with paper towel. Heat a large frypan over a medium-high heat. Brown the beef in 3 batches. Remove each batch and place in a casserole dish. pour over the reserved marinade and herbs. Add the stock and flour. Stir to mix.

3) Cover the casserole dish, place in oven. Stir every 40 minutes, add water if needed to keep the ingredients just covered. Cook until the beef is almost tender (about 80 minutes)

4) Heat the oil and butter in a small frypan, add the onions and cook stirring for 10 minutes or until lightly golden, remove and set aside. Cook the mushrooms in 2 batches, remove and set aside. Add the bacon to the pan, cook until crispy. Add the onions, mushrooms, bacon and water to the beef, stir gently to combine. cook for a further 20-30 minutes or until beef is tender.

This dish definitely smelt good, and I served it with some rice and broccoli. However, I don't know whether it's because of the time problem that I didn't cook for long enough or because the beef I bought (I used gravy beef). The beef turned out quite hard and chewy, and there was a lack of flavour in taste! ummm.... unfortunately my first beef bourguignon turned out to be a fail! =(

Monday, August 9, 2010

Udon in Miso Soup

Do you know that besides the individually wrapped udons you find on the long life shelves from Asian grocery stores, you can also find udon in the freezer section? I was first introduced to the frozen udon by my dad, and he told me that it's a must try, and taste so much different to the usual ones! After the first bite, I knew immediately why my dad said it's a must try! The texture taste really different to the usual vacuum packed ones, it is far more chewier which resembles the handmade udon! No wonder the price doubles the vacuum packed ones!

Dinner at home without hubby means simple noodle night - udon noodle with dumplings and tiger prawns in miso soup. Dumplings and frozen prawns in the freezer always come in handy when dining alone!


Lamb Cutlet with Roasted Vege

I haven't been able to find out why there's a bank holiday! What so special about bank that they get a day off? Why isn't there a 'Creative Holiday', 'Accountant Holiday', 'Lawyer Holiday' or 'Engineer Holiday'. Quite unfair I reckon! But what I got out of it was a dinner made by hubby!

Since he gets a day off, so I told him that it's probably time for him to make me a dinner.... ummm... when was the last time he made one for me?!??! Need to look up the ancient history book!

He started going through my cookbook on saturday to see what he could manage to do with minimum fuss! hahahah... It actually felt good seeing him flipping through the books, at least I knew that he was taking the task seriously, and I won't just get 2 slices of toast for dinner!

Surprise Surprise... got home after work, and found that hubby just started cooking not long ago, although I called him when I was leaving work, just to give him a hint that he better start cooking! Oh well... I guess that's the men's way of chef time management!

Ta-da... dinner ready after 45 min of wait.... not complaining, but I was just expecting I could have dinner early one night! (I just like to have dinner early, so I don't hug my full belly to sleep, and have it turn into fat overtime!)

This time, hubby prepared pan fried lamb cutlet with roasted vege and fries... I think he chuck the fries in because he saw there were some left over in the freezer! The taste wasn't bad at all.... keep on the good work, and I'll give you more opportunity to refine your skills!

=P

Sunday, August 8, 2010

Boon @ Darlinghurst


If you have been following, I mentioned a while ago that my mum's birthday was coming up, and I got her some tea from Tea Too, and needed to think of some other things to go with it. Well... my parents are always very hard to buy presents for, especially my mum!! Cos she doesn't really want anything in particular, because she has got everything she needs basically. So buying present for my mum is always a hard task!

Anyway... I've read in other people's blog that there's a handmade chocolate shop in Darlinghurst called Boon, and it has received quite a few good comments, plus the pastry/chocolate chef is an Asian girl which made me particularly interested! Since it's just so close to my church, so I went there for a visit one Sunday afternoon!

I pushed opened the door and was immediately greeted by the guy standing behind the chocolate counter. I believe he's one of the co-founder of this place called Alex, I do vaguely remember his face from one of the articles! I browsed through the chocolate cupboard, and all of the chocolate were very attractive indeed. I didn't even bother reading all the descriptions on each of the tags, because I knew that I wanted them all! Since I couldn't decide what to get, so I've asked him to do me a random mixture of the 16 piece gift box!

The one chocolate that really caught my eye was 'Mira' which is a round dome of chocolate in vibrant red colour. Mira is a white chocolate ganache infused with Tasmanian mountain pepper berry and strawberry - sounds really interesting! I guess what makes Boon differ from some other common chocolate shop like Lindt or Guylian is Fanny Chan - the chef really likes to experiment, and infuse different/random flavours into the chocolate - eg. sesame, balsamic vinegar, lemongrass, anise etc etc....

Alex kept on asking me whether I was first time there, and as soon as I said 'yes', he was kind enough to offer me a piece of their pistachio flavoured chocolate. Personally I'm not a big fan of pistachio, but the subtle flavour together with the beautifully smooth dark chocolate was gorgeous!

I think when I get a chance I'll definitely go back for an afternoon tea since it has an upstair section which serves coffee, hot chocolate, petite fours, and of course chocolates!


Boon
251 Victoria Street,
Darlinghurst


Tuesday, August 3, 2010

Pan Fried Salmon with Chili Lime Sauce

I have been brought up with a 'fishy diet' since I was young, because my parents reckon that fish is good for you, and low in fat, therefore we should eat more! Therefore my weekly diet used to be either fish + vege, vege + vege, or vege + fish... very occasionally I get some meat in my meal! Not until I got married, and moved out of home that I had to compromise with my hubby and get to taste more meat. I'm not complaining, but I do miss my fish sometimes!

A friend from work who also has a farm up in Hunter Valley brought me some of his produce - freshly grown lime, so I've decided I need to make use of that, and do a pan fried salmon with chili lime sauce!

Ingredient
2 salmon fillet with skin
1 lime, rind and juice
1 tbsp sweet chili sauce
1 tsp brown sugar
bok choy

1. Blanch the boy choy in salted water and a little oil, and drain.
2. Mix the lime juice, rind, sugar, sweet chili sauce and a little water together in a small pot. Heat over medium heat until sugar melted and sauce thickened slightly.
3. Heat a little oil in pan, and pan fry the salmon skin side down first over medium heat. Sprinkle salt and pepper on top. Flip the salmon when the skin becomes crispy. Cook the other side for another 5 minute or until slightly browned.
4. Arrange bok choy on plate with salmon fillet on top, drizzle sauce on top.

The salmon was just cooked, the meat can be easily separated with a slight flick of the fork. The citrus sauce married nicely with the salmon, but I reckon I could have made the sauce a little thicker, and turn it into a glaze! Love this quick and easy and healthy meal!

Buttermilk Pancake

Saturday morning is a special day for special breakfast - a break away from the usual quick weekday breakfast ie. toast, banana bread, cereal, or porridge. And today's special is Buttermilk Pancake!!! Why buttermilk pancake?!?! Because I had to finish off the carton of buttermilk from the Red Velvet Cake!! =P

Buttermilk is such a fantastic ingredient! It helps to make cake/pancake becomes nice and fluffy, and it can also help breaking down the fiber in meat, making it soft and tender! Magic!

Ingredients
1 cup of self raising flour
40g caster sugar
1 egg, separated
15g butter, melted
1/2 tsp vanilla extract
1 cup buttermilk
maple syrup, to serve

1. Combine flour and sugar in a large bow, whisk in combined egg yolks, butter, vanilla and buttermilk
2. Beat egg whites in a small bowl with electric mixer until soft peaks form. Fold 1/3 of the egg white into batter, then fold in remaining egg white.
3. Pour a ladle of batter into large heated oiled frying pan, cook over medium heat, until lightly browned on both sides. Repeat with remaining
4. Drizzle with maple syrup.

Hubby's version: Burnt Buttermilk Pancake... opppss... topped with ricotta and maple syrup

My version: Buttermilk Pancake topped with banana and maple syrup

The pancake was nice and fluff, and very filling! A very satisfying breakfast indeed!!! However, I accidently burnt my hubby's pancakes because I was trying to rush through the cooking time. Not a good idea! =P

Sunday, August 1, 2010

Red Spoon Thai @ Gladesville


In the last 6 months I've realised that Gladesville has opened up quite a few new restaurants, I always say to my hubby, we've got to try this restaurant, we've got to try that restaurant.... and as usual, never got around to it somehow, although we drive pass it everyday!

Last friday, a few friends came over for dinner and I said to them... 'no catering from me this time, we're getting takeaway!' Of course there was no objection, because their purpose of coming over is not to eat, but to chat! It was also very rare for us to be free on a friday, cos usually we either have prayer meeting or home fellowship on friday, we only get 1 friday free per month! So we treasured this chit chat time with a group of friends, laying on the couch with a glass of wine in hand! Thanks Iva for bringing all the wines over!

Red Spoon Thai is one of the restaurants in the area which I wanted to try, can't remember how long it has been opened now, but every night I see there are heaps of people in there, so I thought the food must be pretty good! Friday night, I ordered home delivery over the phone (no extra charge for home delivery!), and the waitress said that it will be ready in 45 minutes, and she didn't lie, the food did arrive in 45 min!

Red Spoon Braised Pork Belly $14.90

Pork belly is one of their signature dishes, it has been slow cooked for a long time, the meat just melted in the mouth, no chewing was required! The sauce was sweet with a hint of cinnamon and star anise.... yummmm.... they even took into the consideration that the sauce might be all soaked up by the pork belly and become too sweet, so the sauce together with the cinnamon actually can in a separate container to the pork belly! How considerate!

Crispy Soft Shell Crab with Papaya Salad $9.90

I love soft shell crab and papaya salad! So when I saw this dish on the menu, I knew that it's a must order dish!! The soft shell crab came in a separate paper box to the salad. Although it didn't have the deep-fried crunch which I was expecting, probably due to the fact that it was a home delivery order. However, the dish was still quite nice overall, the sour taste and saltiness in the salad created the entire flavour of the dish was perfect. And with the amount of soft shell crab in the salad, I reckon it was pretty good value!

Assorted Vegetable Stir Fry $12.90

The tofu was actually deep-fried before stir frying with other vegetables, and the macadamia nuts added an extra crunch to the dish!

Gang Phed Ped Yang $23.90
Rich Red Curry of Roasted Duck with Lychee, Pineapple, Cherry Tomato and Vegetables

This is probably one of the best red duck curry I've had, the sauce was rich and creamy, and there were plenty of meaty duck pieces in the dish. The addition of lychee, and pineapple helped to balance out the spiciness of the curry. Perfect match with steamed rice!!! Again, they've put the curry and duck pieces in separate container, so the duck wouldn't be too soggy!!! I would definitely recommend this dish.

Chili Basil Noodle with Chicken $11.90

I love the thick rice noodles.... the flavour was well balanced out with the squeeze of lemon juice. The noodle was stir fried with large succulent chicken breast pieces which was done to perfection! Chili Basil Noodle is always my favourite Thai noodles!

I would definitely come back to Red Spoon Thai to try their other dishes! Home delivery is definitely a good option if you're too lazy to go out, it was free of charge (but you better check with their delivery area first!) and it was on time, the flavour was fantastic, very reasonable priced and the food was packed nicely in a eco bag!!!!! Bonus!


Red Spoon Thai
198 Victoria Rd,
Gladesville

Pork with Caramelised Apple and Parsnip + Pumpkin and Capsicum Pearl Couscous + Orange Salad

'Hey... can I come over to your place for dinner?' Mel asked over the phone.
'Yeah sure.... ' I answered.

Some people might think 'how weird.... why would someone invite themselves to people's home for dinner?!?!'... well... it's not unusual if this conversation applied to my home and Mel, cos she is our family's dearest sister in Christ!!! A close friend who hubby and I can chat with non-stop about everything and anything, a close friend who is also our family accountant, a close friend who organised our wedding in Hong Kong and paid everything up front for us! Thanks Mel!

OK... what's for dinner?!?!?!

Pork with Caramelised Apple and Parsnip
Pumpkin Couscous
Orange Salad

It does sound alot but we had 5 people for dinner at the end, and we polished every bit off the plate!

Pork with Caramelised Apple and Parsnip

7 pork chops
1 tbsp olive oil
sea salt + cracked black pepper
2 granny smith apple, peeled + chopped
2 parsnip, peeled + chopped
1 lemon, halved
60g butter
1 tbsp brown sugar

1. Preheat over to 200C
2. Heat frying pan over high heat. Brush pork with oil and sprinkle with salt and pepper. Cook for 1-2 min on each side or until browned
3. Place the apple, parsnip, lemon, butter and sugar in a baking tray, toss until well combined
4. Top with pork chop, and roast for 25 min.

I very rarely cook pork chop, because I tend to overcook my pork, and therefore become dry and chewy! But this time, the pork chop was tender and juicy, and the sour taste in the apple helped to balance out the fat of the pork! You can always swap the apple with pear, parsnip with potato or sweet potato. Recently I bought the griddle pan from Aldi, loved the grill mark on the pork! =)

Pumpkin Couscous

1 pack of pearl couscous
1/3 of a pumpkin, peeled and diced
1 red capsicum, cut into small pieces
salt and pepper

1. Roast the diced pumpkin in the oven at 180C for 20 min.
2. Cook the couscous according to the instruction on the back of pack.
3. Mix pumpkin and capsicum into couscous, sprinkle in salt and pepper.

I first tried this pearl couscous in the Food and Wine Show, and i was in love with it! It has much better texture than the usual couscous, and the chewiness in the grain is awesome! Must try!

Orange Salad

2 oranges, peeled and sliced
1 tbsp maple syrup
handful of roasted hazelnut, chopped

1. Mix the maple syrup with a little water to make it more runny. Heat it up on stove or in microwave.
2. Arrange the sliced oranges on plate, pour the maple syrup on top. Sprinkle with hazelnut.

The orange itself was super sweet, and the hazelnut helped to give it a crunch to the texture. This fresh and citrus salad was a fantastic dish to help breaking up the heaviness of pork and couscous! If you want, you can substitute the hazelnut with other roasted nut, maple syrup with honey, and add some chopped mint in there to make it extra fresh. Be creative!!! I just used whatever I had left over at home! =P


Red Velvet Cake

I first heard of this cake from one of the blogs I follow from a long time ago, probably more than 1 year now. Initially I didn't see anything special about this cake, except it's red, so at that time I didn't bother going into making it. But for the next 6 months, I started to see so many people blog and rave about it, and it seemed that it was the big heat at that time. However, I still didn't get around to making it!!! Recently, I've seen a couple of my friends Lee and Sera started making them as well, which inspired/reminded me to give it a go!

I started researching in the red velvet cake recipes, most of the them are pretty similar. The only variation is pretty much the amount of food colouring. When I first read the recipe, I thought 'oh... my goodness, the whole bottle of red colouring?!?!?!?' Then I found some that uses only 2 tbsp, I guessed it depends on how vibrant you want the red to be. So I took a medium, and used half bottle! Never used so much colouring in a cake before, usually it's only a drop or two... ummm... maybe except for the Thomas Cake!

Ingredients:
2.5 cup of sifted plain flour
1tsp baking powder
1tsp salt
2 tbsp cocoa powder
120g butter
1.5 cup sugar
2 eggs
1 tsp vanilla extract
30ml red food colouring
1 cup buttermilk
1 tsp white vinegar
1 tsp baking soda

1. Preheat oven to 180C. Grease tin.
2. Sift flour, baking powder, salt, and cocoa together
3. Cream butter and sugar together until fluffy

4. Beat in eggs, one at a time. Mix in vanilla and red colouring
5. Add in 1/2 of the flour mixture, and beat well. Add 1/2 of the buttermilk, then repeat the process.
6. In a small bowl, mix together the vinegar and baking soda (this is the exciting part!!! seeing it fizz!)
7. Add to cake mixture, and pour the batter into the prepared tin and bake for 40min.


a slice of the cake with the melted coloured sugar on top! =(

I have never been really good in slicing the cake horizontally creating layers, I can just never have my knife straight! =( Therefore instead of my original plan of slicing it into 3 layers, I could only get 2 out of it!! Oppsss....

As all the other red velvet cake, I covered it and layered it with cream cheese icing.... Yummmm.... And to make the cake look more interesting, I coloured some of the sugar red, and decorated the cake with it. Good idea for the first 10 minute, but realised that it was bad idea after a while, because the sugar started to melt into the cream cheese icing! =(

Ok... first time failed!!!! Will need to try again!